Introduction
If you’re looking to take your photography game to the next level, then learning about bracketing photography is an absolute must. Bracketing photography is the practice of taking multiple shots of the same scene at different exposures. By doing this, you can create one image with perfect lighting and color balance that wouldn’t be possible with a single shot.
The practice of bracketing photography has been around since the days of film cameras, but it has become much more popular in recent years as digital cameras have become more powerful and sophisticated. With the right equipment and knowledge, anyone can use bracketing to take stunning photos.
A Beginner’s Guide to Bracketing Photography
Before you start using bracketing photography, there are some basic concepts and settings that you need to understand. First, you need to know how to adjust your camera settings to achieve the desired exposure. You also need to choose the right lens for the job and decide whether or not to use filters. Finally, you should learn the different types of bracketing and how they can help you capture the perfect photo.
What You Need to Know Before Starting
The first thing you need to know before starting bracketing photography is how to adjust your camera settings. You need to understand shutter speed, ISO, and aperture so that you can make sure your photos are properly exposed. It’s also important to understand white balance and how it affects the colors in your photos. Once you have a good understanding of these basic settings, you’ll be ready to start bracketing.
Step-by-Step Instructions for Bracketing Photography
Once you’ve got a good understanding of the basics of photography, you’re ready to start bracketing. The basic steps for bracketing photography are as follows:
- Set up your camera on a tripod and compose your shot.
- Choose a bracketing mode (standard, HDR, focus, or tone mapping).
- Adjust the settings (shutter speed, ISO, aperture, etc.) for each shot.
- Take several shots at different exposures.
- Process and edit your photos.
By following these steps, you can easily capture professional-quality photos with your camera.

Tips for Getting the Best Results from Bracketing Photography
Once you’ve got the basics down, there are some tips and tricks you can use to get the most out of your bracketing photography. Here are a few tips for getting the best results from your bracketing photography:
Adjusting Settings for the Situation
When it comes to bracketing photography, it’s important to adjust your settings for the situation. Different scenes require different settings, so it’s important to experiment and find the right combination of shutter speed, ISO, and aperture for each shot.
Choosing the Right Lens
Another important tip for bracketing photography is to choose the right lens for the job. Different lenses have different characteristics, so it’s important to choose one that will give you the best results. For example, if you’re shooting landscapes, you’ll want to use a wide-angle lens to capture the full scene.
Utilizing Filters
Using filters can be a great way to get more creative with your bracketing photography. Different filters can give your photos a unique look and feel, and they can also help control the light in tricky situations. Be sure to experiment with different filters to see what works best for your particular situation.
Exploring Different Types of Bracketing
Finally, it’s important to explore the different types of bracketing available. Standard bracketing is the most common type, but there are also other types such as high dynamic range (HDR) bracketing, focus bracketing, and tone mapping.

Exploring Different Types of Bracketing
Now that you know the basics of bracketing photography, let’s take a closer look at the different types of bracketing and how they can help you capture the perfect photo.
Standard Bracketing
Standard bracketing is the most common type of bracketing. It involves taking three shots at different exposures – typically one under-exposed, one correctly exposed, and one over-exposed. These three shots can then be combined into one photo with perfect lighting and color balance.
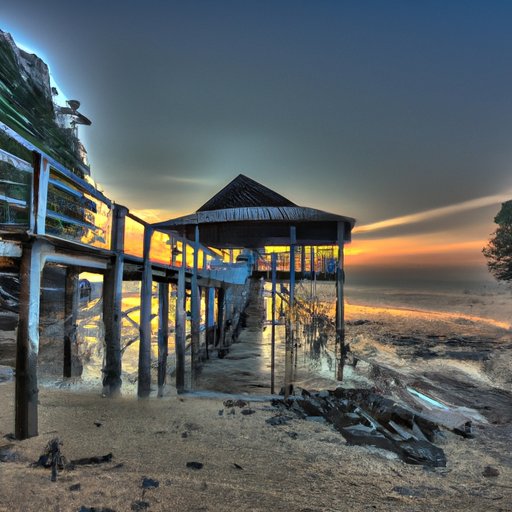
High Dynamic Range (HDR) Bracketing
High dynamic range (HDR) bracketing is similar to standard bracketing, except that it involves taking multiple shots at different exposures to capture the full range of tones in a scene. This type of bracketing is often used for landscapes, cityscapes, and other scenes with high contrast. By combining all of the shots together, you can create a stunning image with perfect lighting and color balance.
Focus Bracketing
Focus bracketing is a technique used to capture sharp photos of close-up subjects. It involves taking multiple shots at different focus settings, then combining them into one photo with perfect focus throughout. This type of bracketing is especially useful when shooting macro photography.
Tone Mapping
Tone mapping is a type of bracketing that uses software to process the photos and enhance the details. It involves taking multiple shots of the same scene at different exposures, then processing them with specialized software to bring out the full range of tones and textures. This type of bracketing is often used to create surreal-looking images.

Creating Stunning HDR Images with Bracketing Photography
High dynamic range (HDR) images are created by combining multiple exposures of the same scene into one photo. By doing this, you can capture a wider range of tones and highlights than is possible with a single shot. Here’s a step-by-step guide to creating stunning HDR images with bracketing photography:
What is HDR?
HDR stands for High Dynamic Range, which is a technique for capturing a wider range of tones and highlights than is possible with a single shot. By taking multiple shots of the same scene at different exposures, you can create a single image with perfect lighting and color balance.
Merging Multiple Exposures
Once you’ve taken multiple shots of the same scene at different exposures, you need to merge them into one photo. This is done with specialized software such as Adobe Photoshop or Lightroom. The software will analyze the photos and combine them into one image with perfect lighting and color balance.
Processing and Editing HDR Images
Once you’ve merged the photos into one image, you can start processing and editing the HDR image. This involves adjusting the levels and curves, as well as adding special effects such as tone mapping and split toning. With the right tools and techniques, you can create stunning HDR images that would be impossible to achieve with a single shot.
Conclusion
Bracketing photography is a great way to capture professional-quality photos. By understanding the basics of exposure, choosing the right lens, and exploring different types of bracketing, you can easily take stunning photos with your camera. With the right equipment and knowledge, anyone can use bracketing photography to create amazing images.
In this article, we explored what is bracketing photography, including a beginner’s guide to setting up and taking bracketed photos as well as tips for getting the best results. We also looked at how to create stunning HDR images with bracketing photography. No matter what type of photography you’re interested in, bracketing photography is a great way to take your photos to the next level.
Recap of Key Points
- Bracketing photography is the practice of taking multiple shots of the same scene at different exposures.
- It’s important to understand basic camera settings, choose the right lens, and use filters when bracketing.
- Different types of bracketing include standard, HDR, focus, and tone mapping.
- HDR images are created by merging multiple exposures of the same scene into one photo.
- With the right equipment and knowledge, anyone can use bracketing to take stunning photos.
Final Thoughts on Bracketing Photography
Bracketing photography is a great way to take your photos to the next level. With the right equipment and knowledge, you can use bracketing to create stunning images with perfect lighting and color balance.
(Note: Is this article not meeting your expectations? Do you have knowledge or insights to share? Unlock new opportunities and expand your reach by joining our authors team. Click Registration to join us and share your expertise with our readers.)