
Introduction
Keeping your lawn looking tidy requires regular maintenance, and part of that maintenance involves stringing your Husqvarna weed eater. This article provides a comprehensive guide on how to string a Husqvarna weed eater, including step-by-step instructions, tips for selecting the right trimmer line, troubleshooting common issues, and maintenance tips for optimal performance.
Step-by-Step Guide to Stringing a Husqvarna Weed Eater
Stringing a Husqvarna weed eater involves a few simple steps, but it’s important to follow them carefully to ensure proper installation. Here is a step-by-step guide on how to string a Husqvarna weed eater:
Preparing the Trimmer
The first step is to prepare the trimmer for the installation. Make sure the trimmer is off and unplugged, then remove the spark plug wire from the spark plug. This will help prevent accidental start-up while you are working on the trimmer.
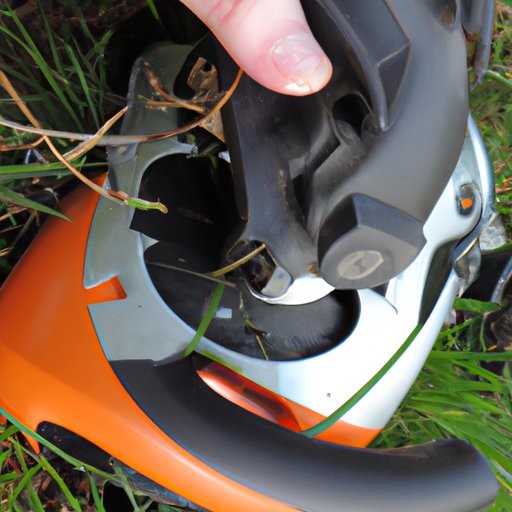
Removing the Old Line
Once the trimmer is prepared, you can begin removing the old line. Start by taking off the trimmer head, which is typically held on by two screws. Once the head is removed, take out the spool and remove any remaining line from the spool.
Installing New Line
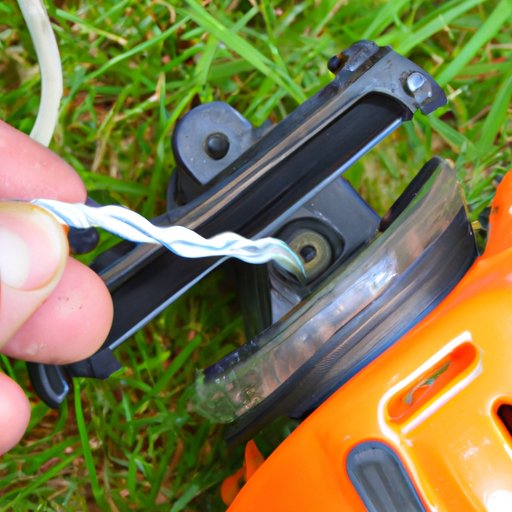
Now you can begin installing new line. First, measure the length of line you need for your particular trimmer. The recommended length will vary depending on the model of your trimmer, so make sure to check the manufacturer’s instructions. Cut the line to the correct length, then thread the ends through the eyelets on the spool. Finally, wind the line around the spool in the direction indicated by the arrows.
How to Change the Trimmer Line on a Husqvarna Weed Eater
Changing the trimmer line on a Husqvarna weed eater is a relatively simple process, but there are a few things to consider before getting started. Here’s what you need to know about changing the trimmer line on a Husqvarna weed eater:
Determining When to Change the Line
Most experts recommend changing the trimmer line every season or after 25 hours of use. This will help ensure your weed eater is performing at its best and will reduce the risk of damage to the engine or other components.
Selecting the Right Line for Your Weed Eater
When selecting a trimmer line for your weed eater, it’s important to choose the right type of line for the job. There are three main types of trimmer line: standard round line, multi-sided line, and twisted line. Each type has its own advantages and disadvantages, so make sure to do your research before making a purchase.
Steps for Changing the Line
Once you’ve selected the appropriate trimmer line for your weed eater, you can begin the process of changing the line. Start by releasing the tension on the spool and removing the old line. Then, thread the new line through the eyelets on the spool and wind it around in the direction indicated by the arrows. Finally, reassemble the trimmer head and tighten the screws.
Replacing the Trimmer Line on a Husqvarna Weed Eater
Replacing the trimmer line on a Husqvarna weed eater is similar to changing the line, but with a few extra steps. Here’s how to replace the trimmer line on a Husqvarna weed eater:
Assembling the Spool
Before you can install the new line, you’ll need to assemble the spool. Begin by inserting the spool into the trimmer head and tightening the screws. Then, thread the new line through the eyelets on the spool and wind it around in the direction indicated by the arrows.
Positioning the Spool in the Weed Eater
Next, you’ll need to position the spool in the weed eater. Take note of the arrow on the spool, which indicates the direction of rotation. Place the spool in the weed eater so that the arrow is pointing away from the handle, then secure the spool with the retaining clip.
Loading the Line
Finally, you can begin loading the line. Measure the line to the desired length, then cut it to size. Thread the end of the line through the eyelet on the spool, then wind the line around the spool in the direction indicated by the arrows. Once the spool is loaded, replace the cap and tighten the screws.
Tips for Installing Trimmer Line on a Husqvarna Weed Eater
Installing trimmer line on a Husqvarna weed eater is not difficult, but there are a few tips that can help you get the job done quickly and easily. Here are some tips for installing trimmer line on a Husqvarna weed eater:
Using the Correct Line Length and Diameter
It’s important to use the correct line length and diameter for your particular weed eater. The length and diameter of the line should be specified in the manufacturer’s instructions, so make sure to follow those guidelines when selecting and installing the line.
Avoiding Common Mistakes When Installing the Line
It’s easy to make mistakes when installing the line, so it’s important to pay attention to details. Make sure the line is threaded through the eyelets correctly, and ensure that the line is wound around the spool in the direction indicated by the arrows. Additionally, make sure to check for proper tension after installation.
Checking for Proper Tension After Installation
After you’ve installed the line, you should check for proper tension. If the line is too loose, it won’t provide enough cutting power. If the line is too tight, it can cause excessive wear and tear on the trimmer head. To check for proper tension, hold the trimmer head in one hand and pull the line with the other. The line should be taut but not overly tight.
Troubleshooting Common Issues with Stringing a Husqvarna Weed Eater
Stringing a Husqvarna weed eater is usually a straightforward process, but sometimes problems can arise. Here are some tips for troubleshooting common issues with stringing a Husqvarna weed eater:
Diagnosing Problems with the Line
If your weed eater is having trouble cutting, the problem may be related to the line. Inspect the line for signs of wear or damage, such as fraying or breaks. If the line looks worn, it may be time to replace it.
Resolving Line Breakage Issues
If the line keeps breaking, it could be due to improper tension or incorrect installation. Make sure the line is properly tensioned and that it is threaded through the eyelets correctly. Additionally, make sure you are using the correct type of line for your particular weed eater.
Correcting Line Jamming Issues
If the line keeps jamming, it could be caused by debris in the trimmer head. Remove the trimmer head and clean out any debris that may be stuck inside. Additionally, inspect the line for any signs of wear or damage, and replace the line if necessary.
Choosing the Right Trimmer Line for Your Husqvarna Weed Eater
Choosing the right trimmer line for your Husqvarna weed eater is essential for optimal performance. Here’s what you need to know about choosing the right trimmer line for your Husqvarna weed eater:
Understanding the Different Types of Lines Available
There are several different types of trimmer lines available, each with its own set of features and benefits. Standard round line is the most common type and is suitable for most applications. Multi-sided line is more durable and offers better cutting performance, while twisted line is designed for heavier duty work.
Examining the Features of Each Type of Line
When choosing a trimmer line, it’s important to examine the features of each type of line. Consider factors such as durability, flexibility, and cutting performance. Additionally, make sure to select a line that is compatible with your particular weed eater.
Deciding Which Line Is Best for Your Particular Weed Eater
Once you’ve examined the features of each type of line, you can decide which line is best for your particular weed eater. Talk to a knowledgeable salesperson at your local hardware store to get advice on which type of line would work best for your needs.
Maintaining Your Husqvarna Weed Eater for Optimal Performance
In order to keep your Husqvarna weed eater running at peak performance, it’s important to perform regular maintenance. Here are some tips for maintaining your Husqvarna weed eater for optimal performance:
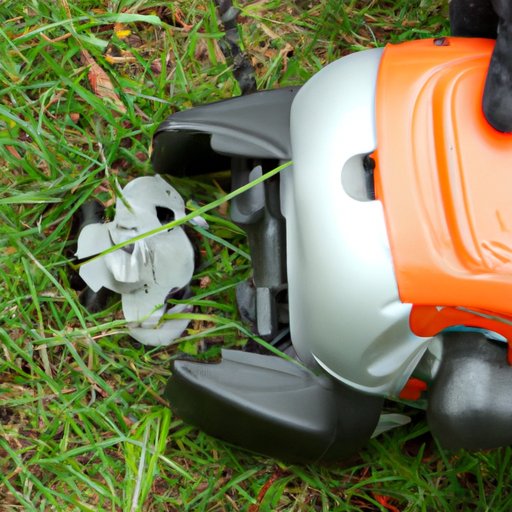
Cleaning the Weed Eater Regularly
Regular cleaning is an important part of keeping your weed eater in top condition. Make sure to clean the exterior of the weed eater regularly to remove any dirt or debris that may be clogging up the engine. Additionally, you should clear away any grass or weeds that may be blocking the air vents.
Inspecting the Trimmer Head for Signs of Wear
The trimmer head is the part of the weed eater that houses the trimmer line, so it’s important to inspect it regularly for signs of wear. If the trimmer head is cracked or damaged, it may be time to replace it.
Checking the Fuel Levels and Oil Levels
It’s also important to check the fuel levels and oil levels regularly. If the fuel or oil levels are low, top them off according to the manufacturer’s instructions. Additionally, make sure to use the correct type of fuel and oil for your particular weed eater.
Conclusion
Stringing a Husqvarna weed eater is not a complicated process, but it’s important to follow the steps outlined above carefully to ensure proper installation and optimal performance. Remember to select the right type of line for your particular weed eater, and don’t forget to maintain your weed eater with regular cleaning and inspections. If you have any questions or need help stringing your weed eater, don’t hesitate to reach out for assistance.
(Note: Is this article not meeting your expectations? Do you have knowledge or insights to share? Unlock new opportunities and expand your reach by joining our authors team. Click Registration to join us and share your expertise with our readers.)