
Introduction
Having a gas fireplace in your home is a great way to stay warm during the colder months. But if you’ve never started a pilot light before, it can be intimidating. The good news is that starting a pilot light on a gas fireplace is an easy process, and once you’ve done it a few times, you’ll have no problem doing it again. In this article, we’ll walk you through the steps of how to start a pilot light on a gas fireplace, from turning off the gas supply to adjusting the flame height.
Step 1: Turn off the Gas Supply to the Fireplace
The first step in starting a pilot light on a gas fireplace is to turn off the gas supply to the fireplace. To do this, you’ll need to locate the gas shut-off valve. This is usually located near the bottom of the fireplace, or behind the access panel. Once you’ve located the gas shut-off valve, turn it clockwise until it’s in the “Off” position.

Step 2: Locate the Pilot Light Assembly and Remove the Protective Cover
Once the gas supply is turned off, you can locate the pilot light assembly. This is usually located at the back of the fireplace, near the bottom. Once you’ve identified the pilot light assembly, remove the protective cover. This will allow you to access the control knob.

Step 3: Push in the Control Knob and Hold for 30 Seconds
The next step is to push in the control knob and hold it for 30 seconds. This will allow the gas to flow into the pilot light assembly. It’s important to make sure that you’re holding the control knob firmly in place for the full 30 seconds, as this will ensure that the gas has time to fill the pilot light assembly.
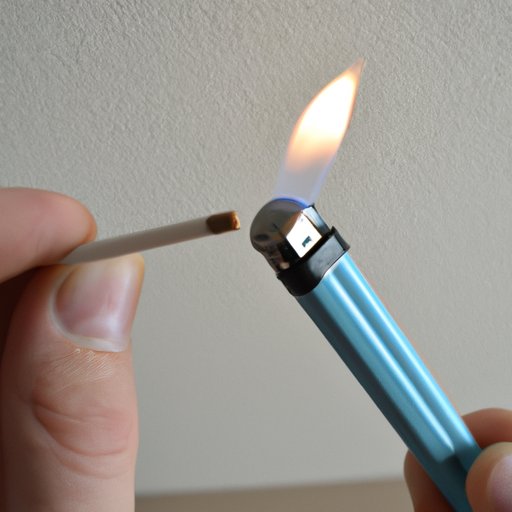
Step 4: Use a Long Match or Lighter to Ignite the Gas
Once the gas has had time to fill the pilot light assembly, you can use a long match or lighter to ignite the gas. Make sure that you’re standing far enough away from the fireplace so that you don’t get burned, and that you’re using a long match or lighter so that you don’t get too close to the flames. Once the gas is ignited, the pilot light should stay lit.
Step 5: Release the Control Knob and Adjust the Flame Height as Needed
Once the pilot light is lit, you can release the control knob. You may also want to adjust the flame height, depending on your preferences. To adjust the flame height, simply turn the control knob clockwise or counterclockwise until you reach the desired flame height.
Conclusion
Starting a pilot light on a gas fireplace is a relatively simple process. All you need to do is turn off the gas supply, locate the pilot light assembly, push in the control knob and hold for 30 seconds, use a long match or lighter to ignite the gas, and then release the control knob and adjust the flame height as needed.
(Note: Is this article not meeting your expectations? Do you have knowledge or insights to share? Unlock new opportunities and expand your reach by joining our authors team. Click Registration to join us and share your expertise with our readers.)