Introduction
Have you ever been stuck on the side of the road with a dead battery? If so, you know the feeling of dread that comes with it. However, there is no need to panic! With the right supplies and knowledge, you can easily jump start your car with jumper cables. This guide will cover all the steps needed to get your car up and running again.
Gather Necessary Supplies
Before getting started, you will need to gather a few supplies. The most important items you will need are jumper cables, a donor vehicle with a working battery, and safety equipment.
Jumper Cables
Jumper cables are an essential tool for jump starting a car. They should be long enough to reach from one vehicle to another, but not so long that they become tangled. Additionally, make sure the gauge of the cable is appropriate for your vehicle’s battery size. According to research from the University of Michigan, “For batteries up to 60 ampere-hour capacity, use #4 gauge wire. For larger batteries, use #2 gauge wire.”
Donor Vehicle with Working Battery
The second thing you will need is a donor vehicle with a working battery. This vehicle will be used to help charge your car’s dead battery. Make sure the donor vehicle is running and has a battery with at least as much power as your own.
Safety Equipment
In order to jump start your car safely, you should also have some basic safety equipment on hand. This includes gloves, safety glasses, and a fire extinguisher. Wearing the gloves and glasses will protect you from any sparks that may occur when connecting the cables. The fire extinguisher is a precaution in case something catches fire.
Park the Vehicles
Once you have gathered all the necessary supplies, you can begin the process of jump starting your car. The first step is to park the vehicles. Make sure both cars are in neutral and their parking brakes are engaged.
Positioning
It is important to position the cars correctly. The dead vehicle should be parked close to the donor vehicle, with the hoods facing each other. This will make it easier to connect the cables.
Keeping Them Separate
Make sure the vehicles do not touch each other. Once the cables are connected, electricity will flow between them. If the vehicles touch, this could cause a short circuit, which could damage the electrical systems of both cars.
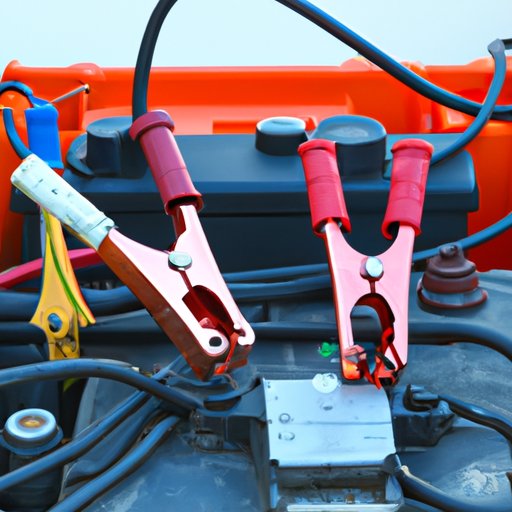
Connect the Cables
Now that the vehicles are in position, it is time to connect the cables. Make sure the engines of both cars are off and all accessories (including the radio) are turned off. It is also a good idea to turn off the headlights, as this will reduce the load on the battery.
Attaching Red Cable to Donor Vehicle
Begin by attaching the red cable to the positive terminal of the donor vehicle’s battery. This terminal is usually marked with a “+” sign. Tighten the clamp firmly, but be careful not to overtighten it.
Attaching Red Cable to Dead Vehicle
Next, attach the other end of the red cable to the dead vehicle’s positive terminal. Again, this terminal is usually marked with a “+” sign. Make sure the clamp is securely attached to the terminal.
Start the Donor Vehicle
With the red cable attached to both batteries, you can now start the donor vehicle. Turn the key and let the engine run for a few minutes. This will give the dead battery enough time to charge.
Running Engine
Let the donor vehicle run for at least five minutes. This will give the dead battery enough time to charge up. During this time, make sure the donor vehicle does not move or the cables could become disconnected.
Charging Dead Battery
If the engine is running smoothly, the dead battery should begin to charge. You may hear a clicking noise as the battery charges. This is normal and indicates that the battery is receiving power.
Start the Dead Vehicle
After the donor vehicle has been running for a few minutes, you can now attempt to start the dead vehicle. Turn the key and listen for the engine to start. If it doesn’t start, wait a few seconds and try again.
Attempt to Start
Turn the key and listen for the engine to start. If it starts, let it run for a few minutes and then disconnect the cables. If it doesn’t start, wait a few seconds and try again.
Waiting and Retrying
If the engine still does not start after a few tries, wait a few minutes before trying again. This will give the battery more time to charge. You may need to repeat this process a few times before the engine starts.
Disconnect the Cables
Once the dead vehicle has started, it is time to disconnect the cables. Do this in the reverse order in which you connected them. Begin by removing the black cable from the negative terminal of the dead vehicle, followed by the black cable on the donor vehicle. Finally, remove the red cable from the dead vehicle and the donor vehicle.
Conclusion
Jump starting a car with cables is a relatively simple process. By following the steps outlined in this guide, you can get your car back up and running in no time. Just remember to always use caution when working with electricity and never attempt to jump start a car if you are unsure of what you are doing.
Summary of Steps
To jump start a car with cables, you will need to gather the necessary supplies, park the vehicles correctly, attach the cables in the proper order, and start the donor vehicle. Once the dead vehicle has started, disconnect the cables in the reverse order.
Reminders for Safety
When jump starting a car, always take safety precautions. Wear protective gloves and glasses and keep a fire extinguisher nearby. Additionally, make sure the donor vehicle is running and has a battery with at least as much power as yours. Following these steps will ensure a safe and successful jump start.
(Note: Is this article not meeting your expectations? Do you have knowledge or insights to share? Unlock new opportunities and expand your reach by joining our authors team. Click Registration to join us and share your expertise with our readers.)