Introduction
Owning a travel trailer means taking on the responsibility of proper maintenance and care. One key part of this is learning how to jack up a travel trailer. This process involves raising the trailer off the ground so you can access its underside for cleaning, repairs, or other work. Before getting started, it’s important to understand what’s involved in the process and take all necessary safety precautions.

Use a Hydraulic Jack to Raise the Trailer
Hydraulic jacks are one of the most common tools used to lift a trailer. This type of jack uses pressurized oil to create lift, and is controlled by a lever that pushes the oil through a system of valves. When using a hydraulic jack to jack up your trailer, there are a few steps you should take.
Prepare the Jack
Before beginning, make sure the jack is in good condition and has enough oil. Check the manufacturer’s instructions to determine the correct type of oil to use and how much to add. If the jack isn’t working properly, don’t attempt to use it. You should also inspect the area where you’ll be placing the jack to make sure it’s free of debris or anything else that might interfere with the jack’s operation.
Position the Jack
Once the jack is ready, place it under the frame of the trailer near the axle. Make sure the jack is firmly seated before attempting to lift the trailer. It’s best to use a block of wood or other material to protect the trailer from damage.
Lift the Trailer
Slowly begin to lift the trailer using the jack. Monitor the jack’s progress and stop lifting when the trailer is high enough to access the underside. Don’t attempt to lift the trailer too quickly as this could cause damage.
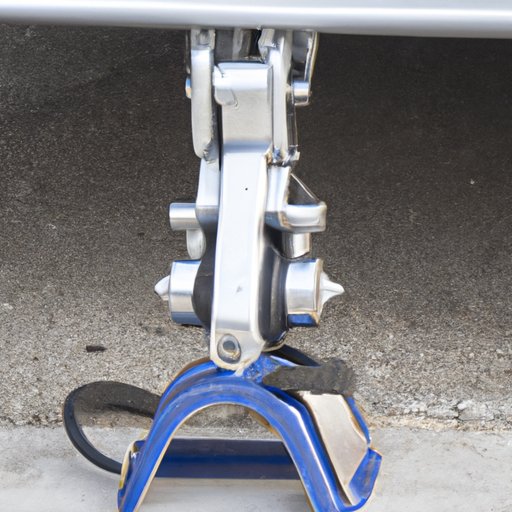
Place Jacks on the Frame of the Trailer
In addition to using a hydraulic jack, you can also place jacks directly on the frame of the trailer. Again, it’s important to take all necessary safety precautions to avoid injury or damage to the trailer.
Find the Appropriate Spot for the Jacks
When placing jacks on the frame of the trailer, you should look for a spot that’s strong enough to support the weight of the trailer. Avoid any spots with visible signs of rust or damage. If possible, place the jacks at least two feet apart to ensure maximum stability.
Place the Jacks Securely
Once you’ve found the appropriate spot for the jacks, securely place them on the frame. Make sure they’re firmly attached and won’t slip off while you’re working. You should also check the jacks periodically to make sure they remain secure.
Secure the Jack with an Appropriate Hitch
An important step in jacking up a travel trailer is securing the jack with an appropriate hitch. This will help prevent the trailer from falling if the jack fails. Make sure to use a hitch that’s rated for the weight of the trailer.
Attach the Hitch to the Jack
Attach the hitch to the jack according to the manufacturer’s instructions. Make sure it’s securely fastened and won’t come loose while you’re working.
Check the Stability of the Hitch
Once the hitch is attached, test its stability by gently tugging on it. If it feels secure, you’re ready to move on to the next step.
Level the Trailer Before Raising It
Before raising the trailer, it’s important to make sure it’s level. This will help prevent the trailer from becoming unbalanced and possibly tipping over.
Use a Leveler to Ensure the Trailer is Even
To make sure the trailer is level, use a leveler to measure the height of each corner. Adjust the jacks as needed to achieve an even level across the trailer.
Adjust the Jacks as Needed
If the jacks need to be adjusted, use a wrench or other tool to loosen the bolts and adjust their position. Make sure the jacks are firmly in place before continuing.

Secure the Trailer by Chocking the Wheels
Once the trailer is raised and level, it’s important to secure it by chocking the wheels. This will help prevent the trailer from shifting while you’re working.
Position the Chock Blocks
Place the chock blocks behind the wheels of the trailer. Make sure they’re firmly in place and won’t slip out of position.
Test the Stability of the Trailer
After positioning the chock blocks, test the stability of the trailer by gently pushing on it. If it feels secure, you’re ready to begin your work.

Test the Stability of the Trailer After Raising It
Once the trailer is raised and secured, it’s important to test its stability. This will help ensure you’ve properly jacked up the trailer and it won’t tip over while you’re working.
Check the Trailer’s Balance
Start by checking the balance of the trailer. If it seems off-kilter, adjust the jacks as needed until it’s even.
Adjust the Jacks as Needed
If the jacks need to be adjusted, use a wrench or other tool to loosen the bolts and adjust their position. Make sure the jacks are firmly in place before continuing.
Conclusion
Jacking up a travel trailer is an important process for maintaining and repairing your vehicle. By following these steps, you can safely and effectively raise your trailer for whatever work needs to be done. Be sure to always take all necessary safety precautions, such as wearing protective gear and chocking the wheels, and make sure to test the stability of the trailer after it’s been raised.
(Note: Is this article not meeting your expectations? Do you have knowledge or insights to share? Unlock new opportunities and expand your reach by joining our authors team. Click Registration to join us and share your expertise with our readers.)