Introduction
Window wells are an important part of the exterior of a home. They provide ventilation and natural light to areas like basements and crawl spaces. Installing a window well is a relatively simple process that can be done by most homeowners with basic DIY skills.
Overview of Window Wells
A window well is a depression in the earth around a window that allows for more natural light and air flow into a basement or crawl space. The window well also helps keep out debris and water from entering the window. Window wells come in a variety of shapes and sizes and can be made from different materials such as steel, plastic, concrete, or wood.
Purpose of the Article
The purpose of this article is to provide a step-by-step guide on how to install a window well. It will cover topics such as how to choose the right window well for your home, what materials and tools are needed for installation, how to prepare the area, how to dig and line the hole, how to install the window well cover, and tips for maintaining the window well.
Step-by-Step Guide to Installing a Window Well
How to Choose the Right Window Well for Your Home
When choosing a window well for your home, it is important to consider the size of the window opening and the type of soil in the area. You should also consider the amount of sunlight you need and the drainage requirements. If you live in an area with heavy rainfall, you may want to opt for a larger window well with a sloped bottom to help move water away from the window.
What Materials and Tools Are Needed for Installing a Window Well?
In order to install a window well, you will need some basic materials and tools. These include a shovel, tape measure, level, landscaping fabric, gravel, window well cover, and sealant. You may also need a post hole digger, depending on the size of the window well.
Preparing the Area for Installing a Window Well
Before beginning the installation process, you should clear the area around the window of any plants, stones, and other debris. This will make it easier to work and ensure that the window well is properly installed.

How to Dig and Line a Window Well
Marking the Area
Once you have cleared the area, mark the area where the window well will be dug. Make sure that the area is level and that the measurements are correct. Once the area is marked, you can begin to dig the hole.
Digging the Hole
Using a shovel, carefully dig the hole for the window well. Make sure that the sides of the hole are straight and that the depth is appropriate for the size of the window well. Once the hole is dug, you can begin to line it with gravel.
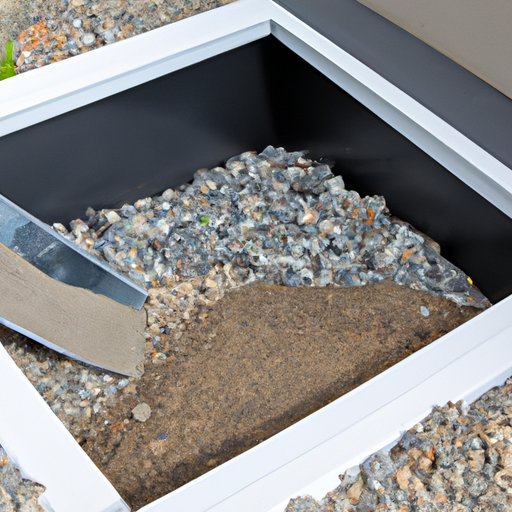
Lining the Hole with Gravel
Gravel is used to help keep the window well from collapsing and to help with drainage. Spread a layer of landscape fabric over the hole and then add a few inches of gravel. Use a level to make sure the gravel is even before adding more. Continue to add gravel until the hole is filled.
How to Install the Window Well Cover
Choosing the Right Cover
The window well cover should fit snugly over the window well and should be strong enough to support the weight of a person. There are a variety of covers available, so make sure to choose one that fits your needs. Most covers are made from steel or plastic.
Attaching the Cover
Once you have chosen the right cover, attach it to the window well using screws or bolts. Make sure that the cover is secure and will not come loose. Once the cover is attached, use a sealant to prevent water from getting inside the window well.

Tips for Maintaining a Window Well
Cleaning the Window Well
It is important to regularly clean the window well to keep it free of debris and dirt. Use a garden hose or a wet/dry vacuum to remove any dirt or leaves that have accumulated in the window well. Be sure to check the condition of the cover as well.
Repairing the Cover
If the cover becomes damaged or worn, it should be repaired or replaced. Check the sealant around the edges of the cover to make sure that it is still intact. You may also need to replace the screws or bolts that hold the cover in place.
Conclusion
Installing a window well is a relatively simple process that can be completed by most homeowners with basic DIY skills. Choosing the right window well for your home, gathering the necessary materials and tools, preparing the area, digging and lining the hole, installing the cover, and maintaining the window well are all important steps in the installation process. Following these steps will help ensure that your window well is properly installed and will last for years to come.
(Note: Is this article not meeting your expectations? Do you have knowledge or insights to share? Unlock new opportunities and expand your reach by joining our authors team. Click Registration to join us and share your expertise with our readers.)